Wheel Building
***Important***
Refer to the valve decal on the rim for orientation when building. This is critical because the rims are asymmetrical. Rims manufactured past June 2015 have angled spoke holes. If you orient the valve hole up, then the 2nd spoke hole angles to the right. There is also an arrow on the center channel right beside this hole. This is the key spoke of a typical build, so you should not have to change your normal process. You can also see that the hole angle alternates if you look closely.
Click here to skip to the spoke length calculator page
Here is a link to the spoke lengths we have been successful with.
***Warranty is void if rims are built with (2.0mm/14g) straight gauge spokes***
Use bladed or double butted spokes. Do not use straight gauge spokes as they are too stiff and can cause carbon rims to crack prematurely. 2/1.8/2mm DT Swiss Competition Spokes are stronger than DT Swiss Champion in most situations as they go through an additional forging process.
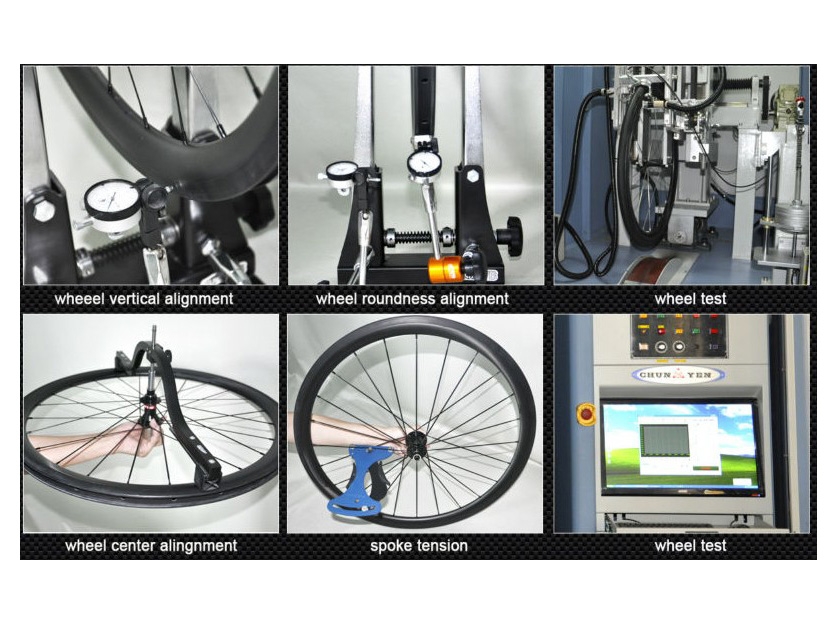
SPOKE TENSION
Spoke tension should be built within 125-135 kg/f on the high tension side after the spokes are stress relieved. The tension will drop to about 115-120kg/f once tires are inflated on the rims. Do not start at 110kg/f or it will drop down too low after you put tires on and get some rides on the wheels.
Don’t exceed 135 kg/f final tension (tires inflated on rims and spokes are broken in and stress relieved). You are increasing the chance of a failure if maintaining spoke tension above 135 kg/f.
Wheels need to be be checked with a tension meter after 6 hrs use and adjusted as required.
Use 2-cross or 3-cross lacing. 2-Cross is slightly stiffer laterally and a bit lighter. We build our 27.5″ wheels 3-cross and our 29″ wheels 2-cross, but either lacing style will work well if you have a preference.
Tips
Grease – We like to use a very small amount of grease between the nipple and the rim. This reduces spoke wind up when building and makes the wheels easier to true in the future. We apply the spot of grease to the nipple as we build so that it doesn’t get messy and harder to clean up afterwards. This takes extra time but it will speed up the final tensioning process and be more predictable.
Washers – We don’t currently build with nipple washers. Our spoke bed is very thick and strong. We are not closed-minded about the use of washers, it’s just that we have not found enough upside to use them at this time.
Preparation – We use DT Swiss nipples with the Prolock compound which helps prevent them from loosening. Alternatively spoke preparation like the popular Wheelsmith Spoke Prep works well. If you’re paranoid about the nipples coming loose, you could try using the Sapim Secure lock nipples (have a distorted thread) in conjunction with Spoke Prep on about half of the spoke threads. If you build with a tension meter and have even and correct tension, then you should not have any issues with nipples coming loose.
DT Swiss Spoke Freeze – works well to prevent the nipples from loosening, but makes it annoying to true the wheels in the future. You have to basically overturn the nipples to break the bond, and then start truing. Our wheels need very little to no truing. The chances are if you need to re-tension the wheel, you need to tighten the whole wheel up slightly. Spoke Freeze will make this more challenging and we recommend against it. We could see using spoke freeze on a problematic wheel that has been re-tensioned so many times that the spoke prep/prolock compound has lost all of it’s effectiveness. You might use spoke freeze before an important event, and then take the time to rebuild your wheel with a fresh coat of spoke prep or prolock nipples in the off season.
Oil – Ultralight spokes like DT Revolution or Sapim Laser are 1.5mm in the middle section. Only experienced wheel builders should use these spokes as they are more challenging to work with. We do not like to use these spokes on the drive side rear, but they work elsewhere. They twist at higher tension and stretch more than regular spokes. Some builders use special pliers to hold them as they tighten the nipples. We recommend oiling the spoke threads and using DT Swiss Prolock nipples if you build with these spokes. I know the Prolock box tells you not to, but you can still use oil with the Prolock nipples and it will help you get the spokes up to the right tension without as much spoke twisting. Make sure the wheel builder is very experienced and uses a tension meter or you may regret those 50 precious grams you are on a mission to save!
NIPPLES
Alloy nipples can be used with carbon rims, however corrosion is amplified when compared to using alloy nipples in an alloy rim. Under harsh conditions or long periods of time, they tend to seize up which makes truing much harder. Generally it is easier to replace with new nipples at this point. Alloy nipples are very light weight. Rotational weight is more valuable, so 40g of savings is attractive for many customers. It is good to understand both arguments for which nipples to use. Nipples are the least expensive part of a wheelset and they come in a wide array of attractive colours, so they are quite popular even though they won’t last as long as brass.
Brass nipples are heavier (adds around 40g to a wheelset) but they have many advantages. They are not as soft as alloy nipples so they are harder to strip, more durable in water/salt/muddy conditions, harder to seize, and are much easier to true with after years of service. Brass does not take colour very well, but you can get them in black. Black won’t be as resilient of finish as with an anodized alloy nipple, therefore we strongly recommend hex head or squorx head nipples (if choosing black) to avoid handling the body of the nipple. We’ve tried various other colours of brass nipples but can’t recommend any of these because the colours are not vibrant and scuff too easily. If you can’t get squorx or hex head nipples, then try to use a 4-sided nipple wrench rather than a 3-sided. The 4-sided wrenches help keep the nipple square and reduces play so you are not wearing off the finish as easily.
Something you might consider is using black brass on the drive side rear, and black alloy elsewhere. This way the weight gain is very minimal and it should match quite well. The drive side rear is the most abused side of any wheelset.
Best Brands – From our experience of what we have built with, DT Swiss and Sapim nipples are the most reliable. I’m sure there are other options out there that we have not tried that may work well.
Nipple Style – The rims are drilled out large enough so that most hex or squorx drivers will fit. When building with bladed spokes, hex/squorx nipples are a big advantage. You can push the bladed spoke holder right up to the nipple because there is no interference with a spoke wrench. This will reduce the stress on a critical area of the spoke. There are some low profile spoke wrenches out there, but generally they only hold the nipple on 3 sides so you can still strip some nipples at higher tension. It is easier to build to full tension with a hex/squorx head nipple without stripping them. Another benefit is you won’t risk scarring the body of the nipple when building.
Do Not use alloy nipples with traditional heads on them. The heads can shear off too easily after 6-12 months of use if there is moisture present. DT Swiss, Sapim and some other brands manufacture nipples with a raised head (Squorx, Hexagonal etc.) We find that using slightly longer spokes with this style of alloy nipple is the strongest. You can get 100% thread engagement in an alloy nipple which is impossible to achieve with a traditional 2x12mm alloy nipple.
SPOKES
***Warranty is void if rims are built with (2.0mm/14g) straight gauge spokes***
Spoke hole offset is 2.8mm for the TR38 and HD38 rims and 2.6mm for the TR28, TR36 and HD36 rims. In general, rounding the long side spoke length down 0.5mm and short side up 0.5mm will work effectively.
We recommend DT Swiss Competition or Sapim Race spokes for riders wanting very durable, no hassle spokes. There are lighter options out there, but these are relatively inexpensive and the most reliable. These are all double butted so they will stretch out during building and maintain their tension better than a straight gauge spoke. Butted spokes go through an extra forging process than straight gauge spokes, so they are actually stronger in most relevant situations. They are also more elastic than straight gauge, so they tend to hold their tension and stay more true. Straight gauge 2mm spokes are too stiff and should not be used.
Bladed spokes such as the Sapim CX Ray and the DT Swiss Aerolite are incredibly light and quite strong for their weight class. Even heavy duty riders can generally get away with using these spokes on the front wheel. You can save 50g per wheel by going to these bladed spokes, so it is worth considering the extra cost if you re doing a custom build.
For aggressive riders, we strongly recommend the Sapim Race and DT Swiss Competition spokes. You kick up more debris in the rear wheel and the larger diameter round spokes will hold up better from rock strikes. Bladed spokes are wider and thinner, so they are more vulnerable if you get debris in the wheel or a dropped chain. Bladed spokes should be inspected more often for damage and replaced as necessary.
Front wheels take far less abuse than rear wheels, therefore it makes sense to build a front wheel differently than the rear. Some might demand that the front and rear are the same, and in this case you should build the rear to the strength required for the rider, and the front will be left slightly heavier than it needs to be (in most cases).
Sapim Sprint and DT Revolution spokes are 2 examples of lightweight double butted round spokes that are quite popular due to similar weight to the bladed spokes, and much lower cost. These tend to stretch out, so you will likely have to re-tension your wheelset sooner than as with other spokes and you have to be a lot more careful when bringing these to full tension. The main disadvantage of these spokes is that as you get to higher tension when building the wheels, they start to twist more easily than heavier spokes. If you don’t account for this when building, you will end up with a significant amount of spoke wind up (especially on the high tension side of the wheel), and they could come out of true more easily. There are a number of ways to combat this. Some builders hold the spoke with pliers when at higher tension to stop them from twisting. You can use a drop of lube on the spoke threads so they spin with less friction ( you need to build with very even tension if you are lubing the threads like this). You can use masking tape to create flags on the spokes so you can see how much twist is on the spokes and counteract at the end of the build.
We love to use DT Competition Race spokes (2/1.6/2mm) as they don’t stretch or twist as much as the lightest round spokes and are significantly stronger. They are also a lot less expensive than bladed spokes. They are not as strong as a regular Competition spoke but are fine for all but the most aggressive riders.
We like traditional J-bend spokes because they are widely available, have a wider bracing angle than with straight pull spokes, and are often easier to build with because they do not rotate in the hub as you tighten/loosen the nipples. J-bend spokes put a bit more stress on the hub flanges, but since you will be using higher quality hubs for your wheelset, this isn’t really an issue. Straight pull spokes have some obvious engineering victories over J-bend spokes, but we see so few spokes breaking at the J-bend that it is hard to justify. The hubs we use have angled flanges which helps in this area as well. There are far more hub choices built J-bend spokes, especially in 28 and 32 hole which we prefer for our wheels. There is no clear cut winner for all circumstances, and both work well and have their advantages.
If your eyes aren’t bleeding yet and you want more info, here is a good read from our friend’s at DT Swiss
